


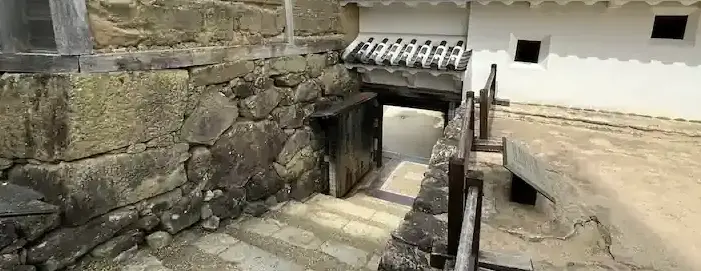
Area 3: Main Keep and Connecting Towers
Climb through the I-Ro-Ha gate sequence — gates named after the Japanese syllabary, arranged in a folded, defensive layout believed to slow and disorient attackers — up to the National Treasure Main Keep itself.
Area 3 unveils the castle’s core: the towering Main Keep, the labyrinth of gates like I-no-Mon and Ro-no-Mon, the strategic Shōgun-zaka slope, and the connecting turrets. These features form one of Japan’s most iconic and sophisticated fortress designs. Explore how each structure contributed to samurai defense tactics, and discover the architectural mastery that earned Himeji Castle its World Heritage status.
I-no-Mon Gate
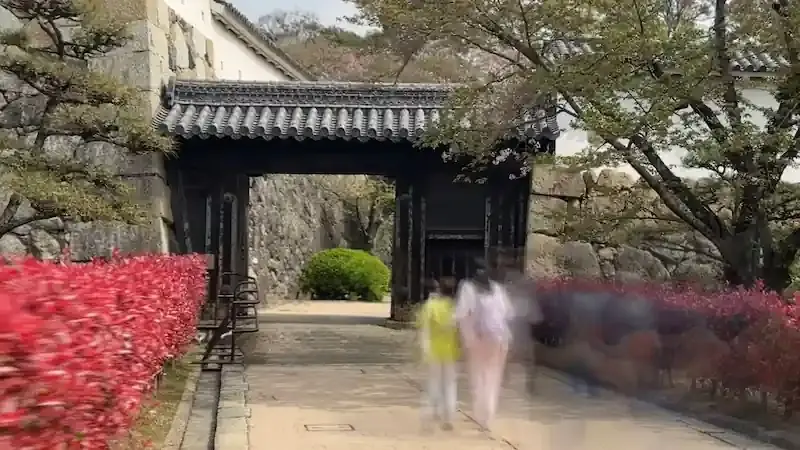
I-no-Mon is the first gate in the iroha-sequence beyond Hishi-no-Mon on the primary route to the main keep, set within a masugata (box-shaped defense space). It follows Himeji Castle’s traditional I-ro-ha gate-naming sequence and exemplifies meiro-gata, a folded, maze-like layout believed to slow and disorient attacking forces — its angle, positioning, and surrounding stonework put attackers at a disadvantage. While Hideyoshi’s earlier castle lacked such advanced gate systems, Ikeda Terumasa’s 1601–1609 modernization introduced I-no-Mon as part of the castle’s transformation into a high-functioning early modern fortress.
| Year built | Early 17th century (Edo period) |
|---|---|
| Builder | Ikeda Terumasa |
| Current status | Still standing |
Access: Approx. 3-minute walk (190 m) from Re-no-Watari Yagura
Suggested time: Quick stop 5 min / in-depth visit 15 min
Ro-no-Mon Gate
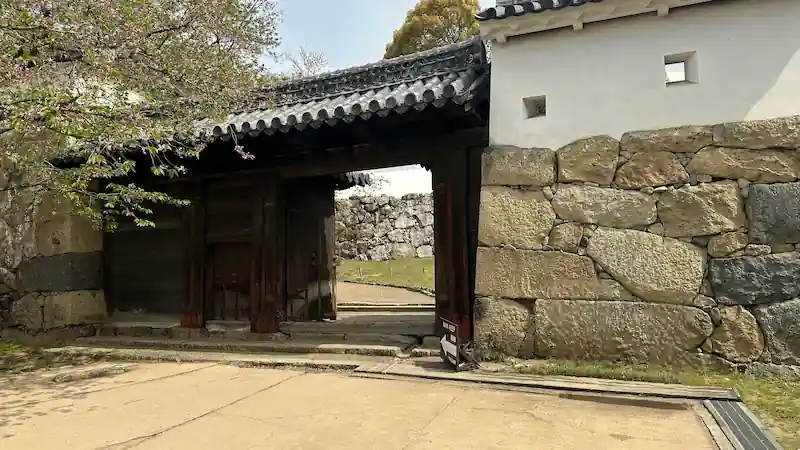
Ro-no-Mon is the second gate along the ascent to the main keep, part of the layered kuruwa (bailey) defense following I-no-Mon in the “I, Ro, Ha…” sequence beyond Hishi-no-Mon, from which the approach route continues toward Ha-no-Mon. It forces attackers to turn at sharp angles while exposed to fire from above and the sides; though modest in scale, it is sometimes described as turret-like in its defensive role, though it lacks a full two-story turret above. It was not part of Hideyoshi’s original fortifications, but was added during Ikeda Terumasa’s 1601–1609 expansion.
| Year built | Early 17th century (Edo period) |
|---|---|
| Builder | Ikeda Terumasa |
| Current status | Still standing |
Access: Approx. 1-minute walk (40 m) from I-no-Mon Gate
Suggested time: Quick stop 5 min / in-depth visit 15 min
Shōgun-zaka (Shogun’s Slope)
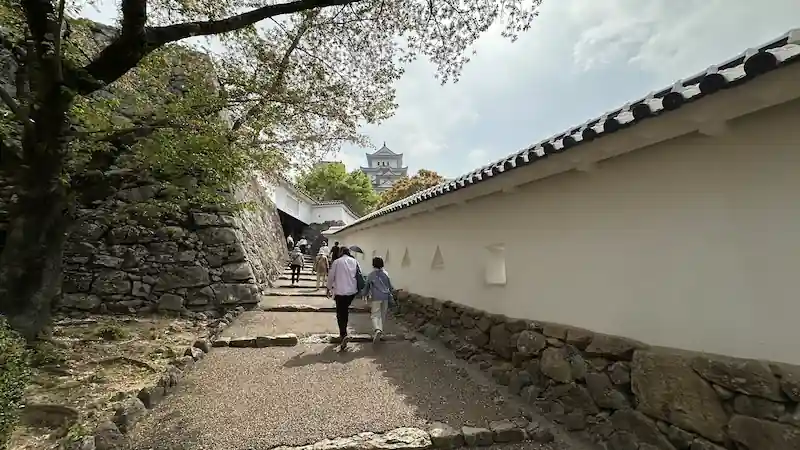
Shōgun-zaka, or “Shogun’s Slope,” is a steep stone-paved path leading to the main keep; its name implies that only a great commander could traverse it. Beyond Ha-no-Mon, the slope begins with a sharp bend, limiting attackers’ visibility and subjecting them to fire from above and both sides — an L-shaped ascent designed to be both physically exhausting and tactically dangerous. It was built during Ikeda Terumasa’s 1601–1609 expansion, representing an evolution beyond Hideyoshi’s simpler layouts.
| Year built | Early 17th century (Edo period) |
|---|---|
| Builder | Ikeda Terumasa |
| Current status | Still exists and is accessible to visitors |
Access: Approx. 1-minute walk (55 m) from Ro-no-Mon Gate
Suggested time: Quick stop 5 min (walking the slope) / in-depth visit 10 min
Ha-no-Mon Gate
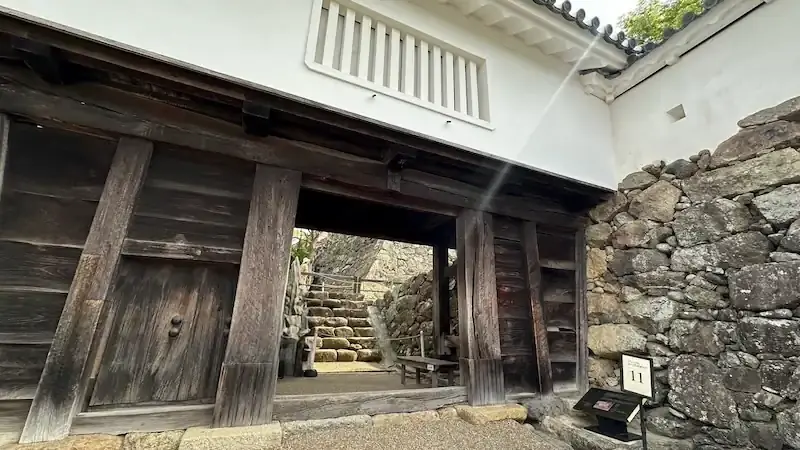
Ha-no-Mon is a gate on the approach to the main keep, part of the “I–Ro–Ha…” sequence. It has a low profile and sturdy doors set in a masugata box-shaped space surrounded by high stone walls; sources vary on its precise gate-type classification, so no single definitive style label is asserted here. It is positioned just south of the keep and forces attackers to turn sharply after passing through, exposing them to flanking fire. Constructed between 1601 and 1609 under Ikeda Terumasa, it is part of the site’s Edo-period defensive architecture.
| Year built | Early 17th century (Edo period) |
|---|---|
| Builder | Ikeda Terumasa |
| Current status | Still standing |
Access: Approx. 1-minute walk (5 m) from Shōgun-zaka
Suggested time: Quick stop 5 min / in-depth visit 10 min
Stone Lantern Base
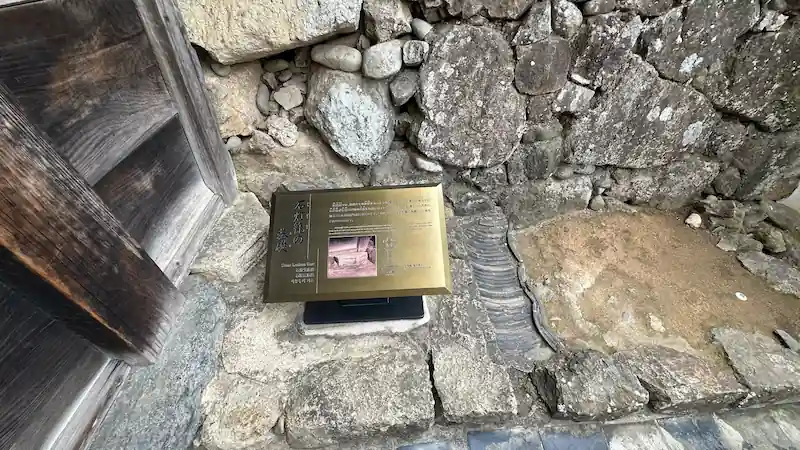
The Stone Lantern Base is a subtle, historically rich remnant in the Bizenmaru area just before the main keep — today only the base of this Edo-period lantern survives, making it a hidden gem often overlooked by visitors. Installed during the Edo period, it likely added ceremonial flair to Bizenmaru, a space for rituals and official receptions, while possibly serving as nighttime illumination, reflecting the castle’s evolution from military fortress to a place of governance and daily life.
| Year built | Unknown |
|---|---|
| Builder | Unknown |
| Current status | Remains present |
Access: Approx. 1-minute walk (2 m) from Ha-no-Mon Gate
Suggested time: Quick stop 3 min / in-depth visit 10 min
Ni-no-Mon Gate 🎥 360°
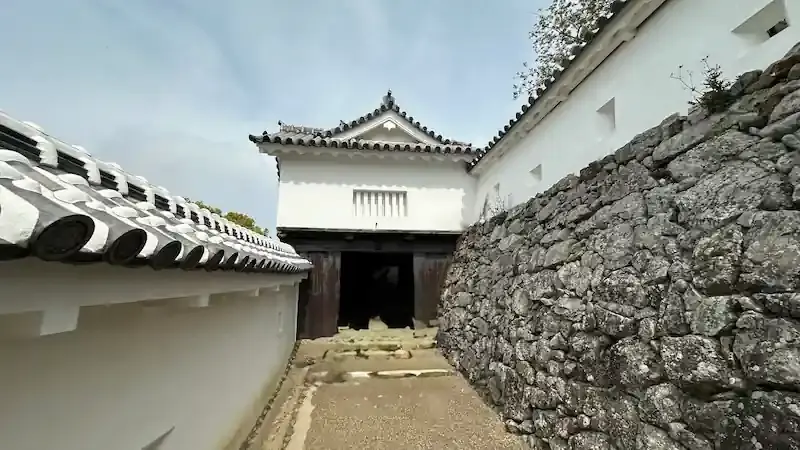
Ni-no-Mon is one of the key defensive gates along the ascending path to the main keep, constructed to break the momentum of enemy advances. Rather than standing alone, it is integrated with the adjoining Ro-no-Yagura turret, forming a combined gate-and-turret structure flanked by massive stone walls, part of a classic masugata defensive space where attackers would be vulnerable to flanking fire from above and both sides.
| Year built | Early 17th century (Edo period) |
|---|---|
| Builder | Ikeda Terumasa |
| Current status | Still standing |
Access: Approx. 1-minute walk (80 m) from Stone Lantern Base
Suggested time: Quick stop 5 min / in-depth visit 10 min
The Cross-Emblazoned Onigawara
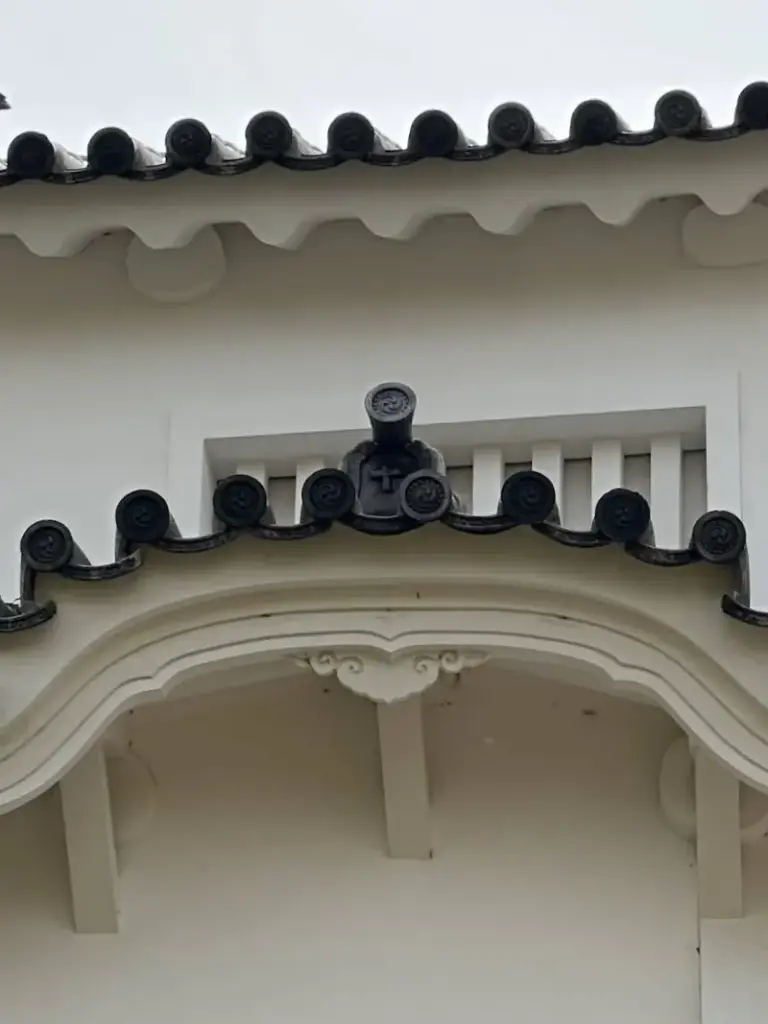
Perched atop the roof of Ro-no-Yagura — the turret integrated with Ni-no-Mon — is a rare decorative ridge-end tile bearing a cross-shaped motif. Its connection to Christian faith is not confirmed, and its exact meaning remains debated. A popular association with Kuroda Kanbei (Yoshitaka), a Christian retainer of Toyotomi Hideyoshi, is likewise unconfirmed — no documented evidence ties the tile specifically to Kanbei. The motif continues to invite speculation among castle historians, but no single interpretation has been established as fact.
| Year built | Late 16th to early 17th century |
|---|---|
| Builder | Unknown |
| Current status | Still present |
Access: Approx. 1-minute walk (15 m) from Ni-no-Mon Gate (look up toward the roof)
Suggested time: ~5 min for a quick glance / ~30 min for a full experience with surrounding turrets and gates
Ro-no-Yagura
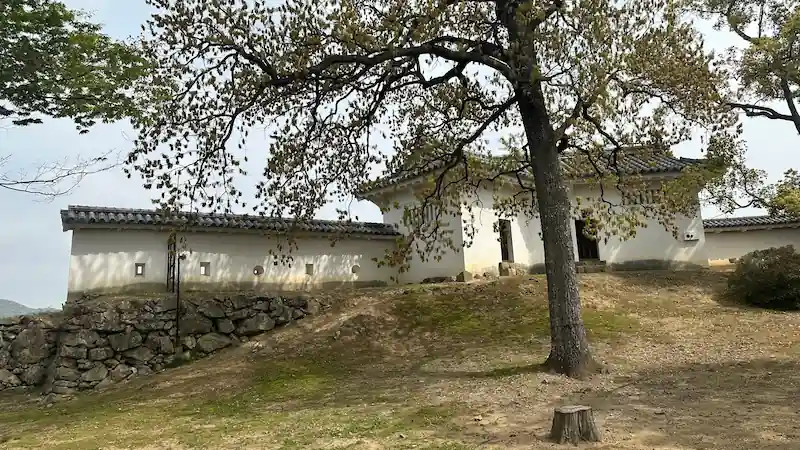
Ro-no-Yagura is a turret integrated with the adjoining Ni-no-Mon gate along the ascent to the main keep, rather than a standalone corner turret. Its first floor’s north side features a projecting lattice window in the karahafu style alongside an ishiotoshi (stone-drop opening), combining aesthetic detail with active defense. A subterranean space sometimes described as a salt storehouse (shiogura) is more specifically associated with the nearby I-Ro-no-Watariyagura connecting corridor on the East Small Keep side rather than with Ro-no-Yagura itself; its interior is not currently open to the public.
| Year built | Early 17th century (Edo period) |
|---|---|
| Builder | Ikeda Terumasa |
| Current status | Still standing |
Access: Approx. 1-minute walk (2 m) from The Cross-Emblazoned Onigawara
Suggested time: Quick visit (exterior only) ~10 min / in-depth exploration ~30 min
Ho-no-Mon Gate 🎥 360°
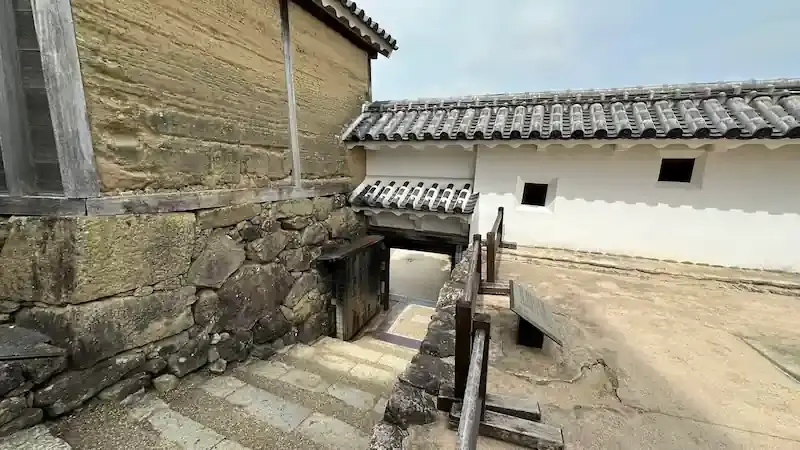
Ho-no-Mon is one of the strategically placed gates on the approach to the Main Keep, named within the “I, Ro, Ha, Ni, Ho…” iroha sequence. It is an umekado — a gate embedded directly into the stone wall — leading into Kitakoshi-kuruwa (the North Bailey), rather than a standalone gate opening onto Bizenmaru. Surrounded on both sides by high stone walls forming a classic masugata courtyard, it forces intruders into a bottleneck for defenders to attack from multiple angles. Constructed during the 1601–1609 renovations by Ikeda Terumasa, it marks a shift from the straight-line layouts common in Hideyoshi’s era toward more labyrinthine, early modern designs.
| Year built | Early 17th century (Edo period) |
|---|---|
| Builder | Ikeda Terumasa |
| Current status | Still standing |
Access: Approx. 1-minute walk (33 m) from Ro-no-Yagura
Suggested time: Quick stop ~5 min / in-depth observation ~15 min
Shioyagura (Salt Turret)
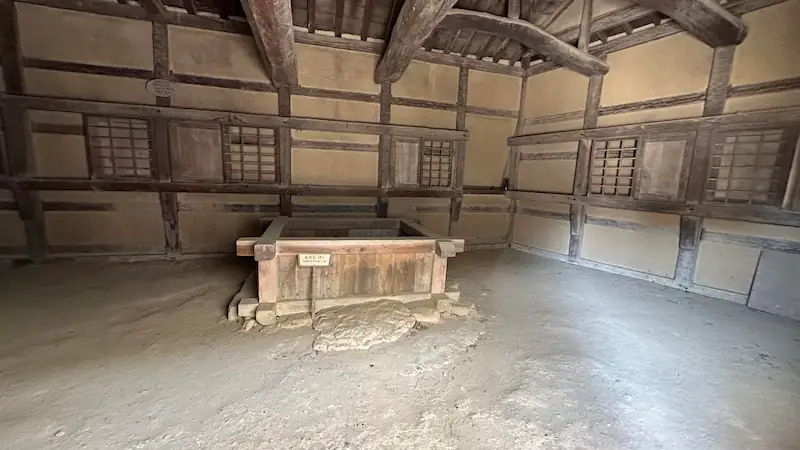
Shioyagura, or “Salt Turret,” stands on the southeastern edge of the main keep complex, in the position shown on the castle’s official maps. Its name places it among several turrets named for goods or equipment once stored there, though the specific contents housed here are not confirmed beyond that general naming pattern. Built as a two-story, two-tiered structure, it held strategic importance due to its proximity to the main keep, serving both as a military defense point — complete with sama (loopholes) and ishiotoshi (stone-drop mechanisms) — and as a supply base. It was newly added during Ikeda Terumasa’s 1601–1609 renovations and was not present during Hideyoshi’s era.
| Year built | Early 17th century (Edo period) |
|---|---|
| Builder | Ikeda Terumasa |
| Current status | Still standing |
Access: Approx. 1-minute walk (5 m) from Ho-no-Mon Gate
Suggested time: Quick view ~5 min / in-depth ~10 min
Aburakabe (Oil Wall)
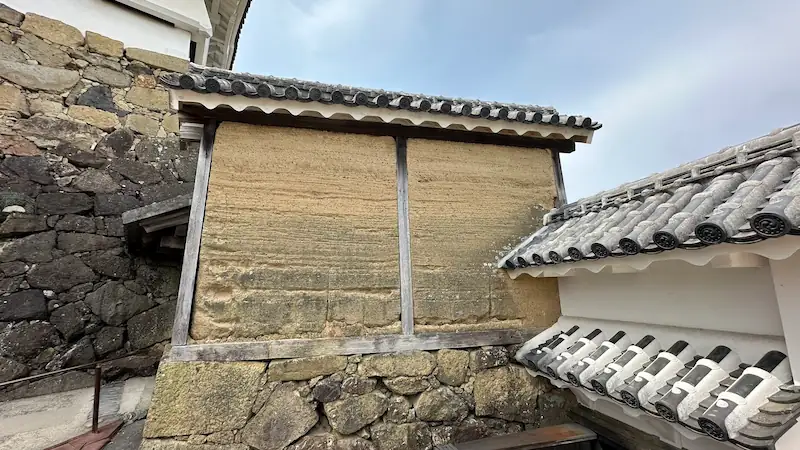
The Aburakabe (Oil Wall) is one of the oldest and most distinctive surviving walls in the castle. Despite its name, no oil was actually used in its construction — it is a hanchiku (rammed-earth) wall, built by tamping down layers of mountain soil, sand, and gravel. It is located between two gates and dates to Toyotomi Hideyoshi’s late-16th-century construction, reflecting the building techniques of the Sengoku period.
| Year built | Late 16th century (Azuchi-Momoyama period) |
|---|---|
| Builder | Toyotomi Hideyoshi |
| Current status | Still standing |
Access: Approx. 1-minute walk (1 m) from Shioyagura (Salt Turret)
Suggested time: Quick stop ~10 min (exterior defenses) / full experience ~30 min (including nearby exhibits)
Ubagaiwa (The Old Woman’s Millstone Stone)
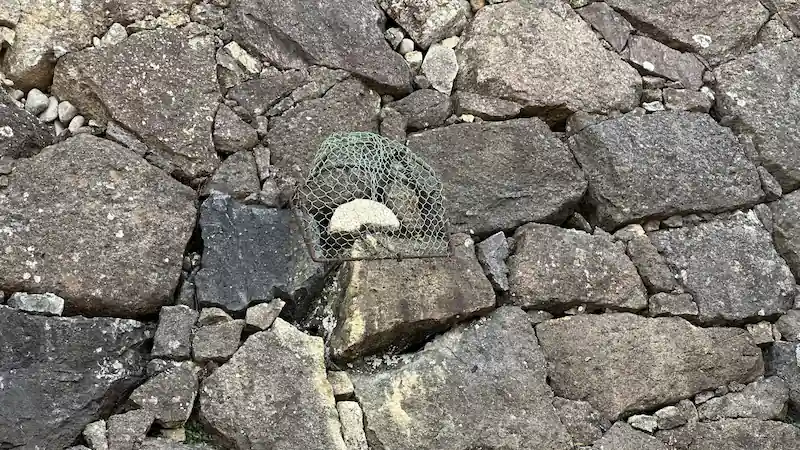
Ubagaiwa, or “The Old Woman’s Stone,” is a quietly nestled landmark at the base of the stone wall on the western side of the main keep. Legend holds that during a shortage of building stones, an elderly woman offered her cherished millstone to aid the castle’s completion — an act of selfless devotion incorporated into the wall. Unlike the darker “human sacrifice” legends tied to other Japanese castles, Himeji’s tale centers on the “offering of the heart,” reflecting a moment of compassion even amid the harsh Warring States period.
| Year built | Late 16th century |
|---|---|
| Builder | Anonymous donation according to legend |
| Current status | Still present |
Access: Approx. 1-minute walk (11 m) from Aburakabe
Suggested time: Quick visit ~5 min / in-depth ~10 min
Mizu-no-Ichi-Mon Gate
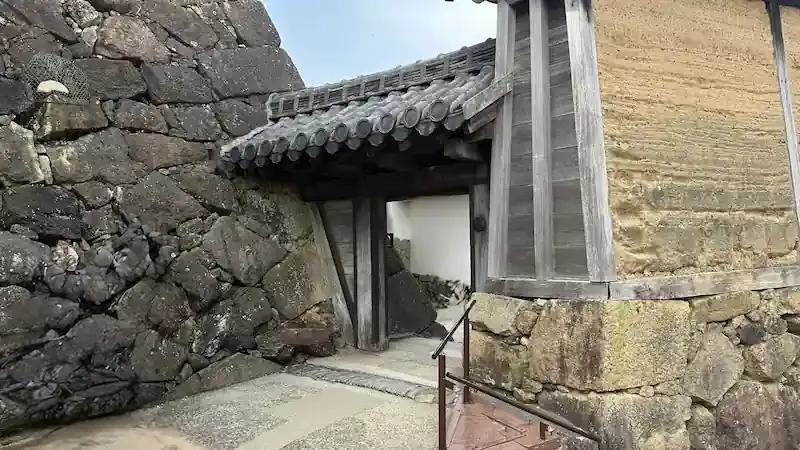
Mizu-no-Ichi-Mon is one of several gates in the Mizu-kuruwa (Water Bailey) gate sequence near the main keep. Several theories exist about the origin of the “mizu” (water) name — including a nearby well and the gate’s position within this stretch of the approach — but no single origin is settled as fact. This modest gate, surrounded by narrow stone paths and steep walls, restricts attacking forces’ movement as part of the castle’s layered defense.
| Year built | Early 17th century (Edo period) |
|---|---|
| Builder | Ikeda Terumasa |
| Current status | Still standing |
Access: Approx. 1-minute walk (15 m) from Ubagaiwa
Suggested time: Quick stop 3 min / in-depth visit 10 min
Mizu-no-Ni-Mon Gate
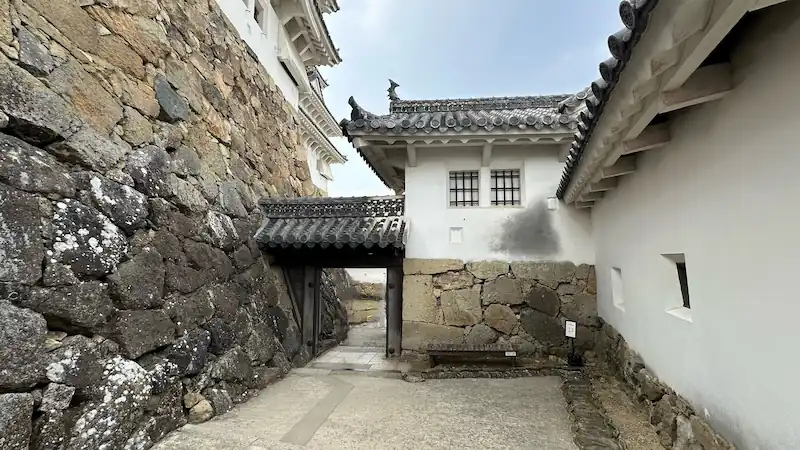
Mizu-no-Ni-Mon is a munamon (ridge-roofed gate) within the Mizu-kuruwa (Water Bailey), situated near the main keep. Following Mizu-no-Ichi-Mon in the gate sequence, this compact gate is flanked by tall stone walls and integrated into a confined masugata; any claims about a specific ceremonial or exclusive-use route through this gate are noted only where confirmed by sourced references.
| Year built | Early 17th century (Edo period) |
|---|---|
| Builder | Ikeda Terumasa |
| Current status | Still standing |
Access: Approx. 1-minute walk (10 m) from Mizu-no-Ichi-Mon Gate
Suggested time: Quick stop 3 min / in-depth visit 10 min
Ninosumi Turret
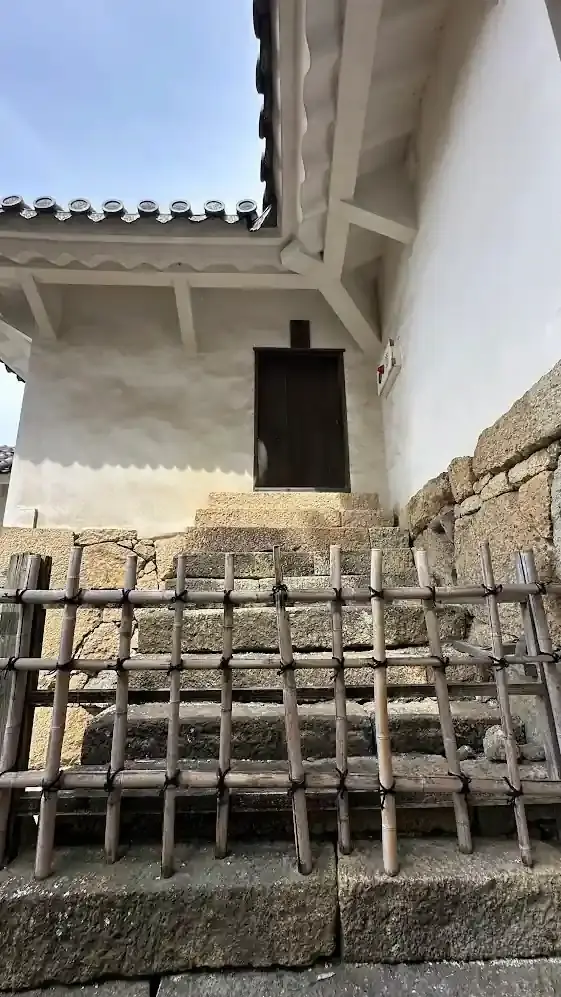
Ninosumi Turret’s name is preserved in on-site signage, though details about its exact position within the Tenshukuruwa (main keep compound), whether it was truly one of a defined set of four corner turrets, and its precise defensive role have not been confirmed by sourced references — these are treated here as pending verification rather than settled fact. The structure itself no longer remains, but its stone foundation is visible near the ascent route within Himeji Castle’s renritsu-shiki tenshu (interconnected keep structure).
| Year built | Early 17th century (Edo period) |
|---|---|
| Builder | Ikeda Terumasa |
| Current status | Foundation still standing (structure no longer remains) |
Access: Approx. 0-minute walk from Mizu-no-Ni-Mon Gate
Suggested time: Quick look ~3 min (foundation site) / in-depth tour ~10 min
Mizu-no-Sanmon Gate 🎥 360°
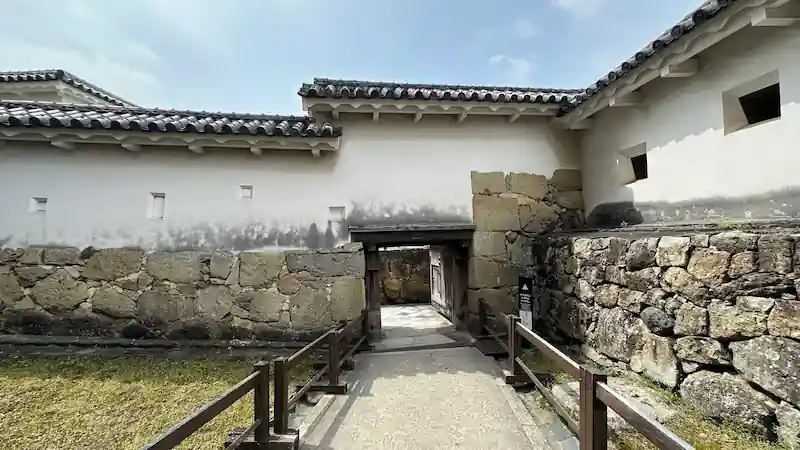
Mizu-no-Sanmon Gate is an umekado (a gate embedded directly into the stone wall) within the Mizu-kuruwa (Water Bailey), following Mizu-no-Ichi-Mon and Mizu-no-Ni-Mon in the gate sequence. Though the structure no longer remains, its location placed it in the path of attackers, forcing them through a narrow, fortified corridor. Claims that this area was a restricted “forbidden zone” tied to protecting a nearby palace well are not confirmed by sourced references and are not asserted here.
| Year built | Early 17th century (Edo period) |
|---|---|
| Builder | Ikeda Terumasa |
| Current status | Structure no longer remains; site preserved |
Access: Approx. 1-minute walk (22 m) from Ninosumi Turret
Suggested time: Quick look ~3 min / in-depth tour ~10 min
Mizunorokumon (Water Gate No. 6)
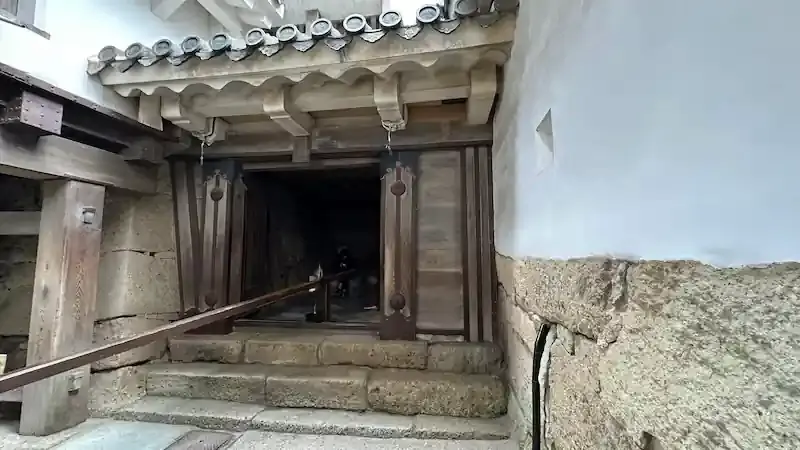
Mizunorokumon, or Water Gate No. 6, is an embedded gate (umekado) within the “Mizu-no-mon” (Water Gates) series. Beyond this gate, the passage makes a 180-degree turn before reaching the main keep’s basement entrance. Note that the fully iron-plated gate among the Water Gates is Water Gate No. 5, not No. 6 — a distinction sometimes confused in popular accounts. Mizunorokumon’s own narrow passage and robust construction exemplify the military ingenuity of the Edo period.
| Year built | Early 17th century |
|---|---|
| Builder | Ikeda Terumasa |
| Current status | Original structure remains intact |
| Renovation history | Included in the Meiji-era “Great Repair” (1910–1911) |
| Cultural property status | Part of Himeji Castle, a UNESCO World Heritage Site |
Access: Approx. 1-minute walk (10 m) from Mizu-no-Sanmon Gate
Suggested time: Quick highlights ~10 min / in-depth exploration ~20 min
Himeji Castle Main Keep (Daitenshu) 🎥 360°
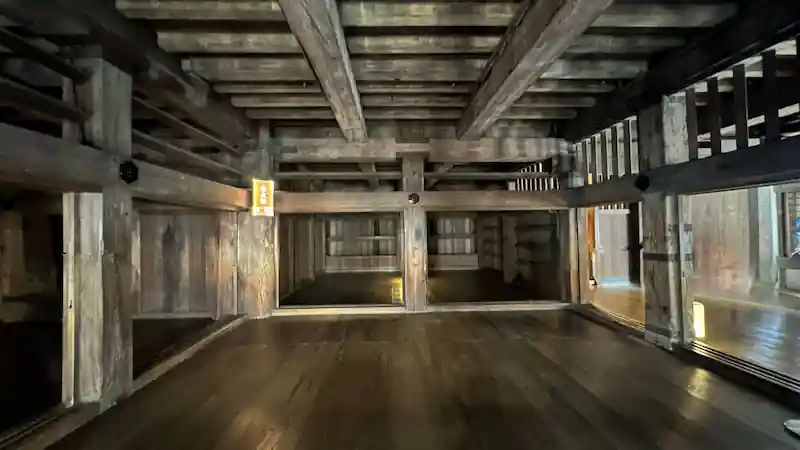
The Main Keep is the defining symbol of the “White Heron Castle” and the pinnacle of Japanese castle architecture. Standing 31.5 meters tall (46.4 meters including its stone base), this wooden structure has 5 tiers on the exterior and 6 floors above ground plus 1 basement level (7 levels in total), earning designation as both a National Treasure and UNESCO World Heritage Site. Though completed in 1609, the keep has been repaired and restored repeatedly in the centuries since, rather than remaining unchanged. Commissioned by Ikeda Terumasa during his 1601–1609 renovation, it was built atop the remnants of a smaller, three-story keep originally constructed by Toyotomi Hideyoshi. The elegant white plastered walls lend a graceful, bird-like appearance, while the interior reveals a deeply practical military design — steep staircases, ishiotoshi, and sama. From the top floor, visitors can enjoy panoramic views of Himeji City, vistas once used by feudal lords for surveillance and signaling. The keep’s advanced wooden joinery and natural ventilation have kept it intact through war, air raids, and earthquakes for over 400 years.
| Year built | 1601–1609 |
|---|---|
| Builder | Ikeda Terumasa |
| Renovation history | Major restorations in the Showa era (1956–1964) and Heisei era (2009–2015) |
| Cultural property status | National Treasure and UNESCO World Heritage Site |
| Remarks | Known as “White Heron Castle” (Shirasagi-jō) for its elegant white appearance |
Access: Approx. 1-minute walk (11 m) from Mizunorokumon
Suggested time: Quick view ~30 min (exterior) / full tour ~60–90 min (including all interior floors)
Osakabe Shrine
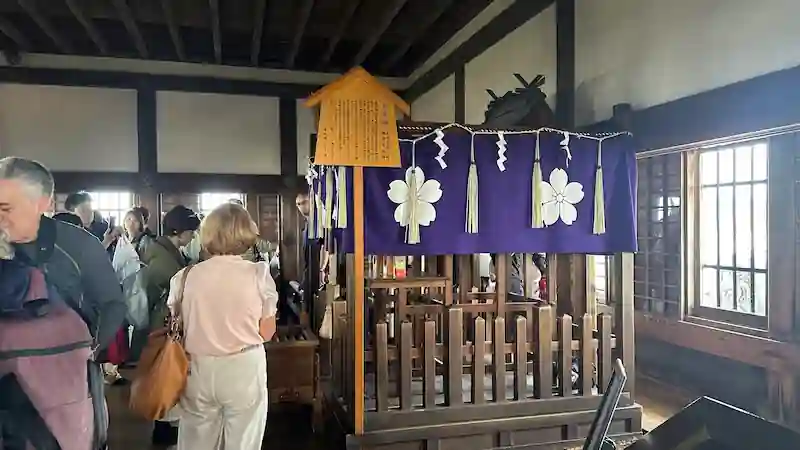
Located on the sixth floor of the Main Keep, Osakabe Shrine is a small, sacred altar long revered as the castle’s guardian deity. “Osakabe” refers to a local Shinto guardian deity believed to have protected the region before the castle was built, deeply rooted in Himeji-area folklore and affectionately called Osakabe-sama by locals. Though its origins are unclear, one theory suggests the deity was originally enshrined on this land and later relocated to the keep’s summit to offer protection against fire, disaster, and misfortune — a shrine at the very top of a castle keep is exceedingly rare in Japan.
| Year built | Early 17th century |
|---|---|
| Builder | Ikeda Terumasa |
| Current status | Still present within the castle grounds |
Access: Reached via the Main Keep interior route
Suggested time: Quick visit ~3 min (to pay respects) / in-depth ~10 min (including surrounding views)
Higashi Ko-Tenshu (East Small Keep)
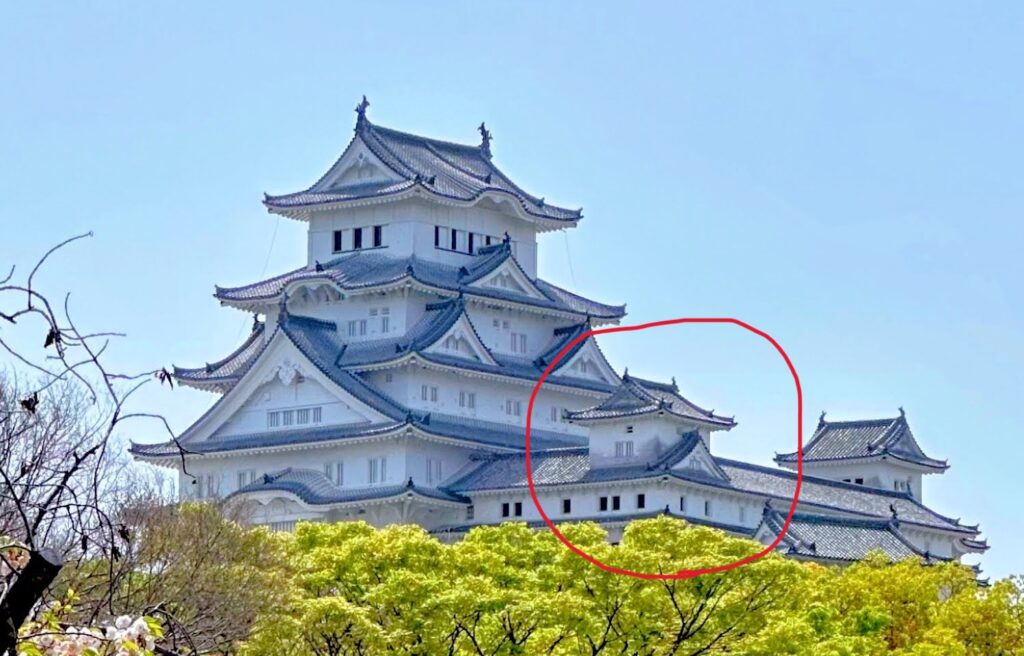
The East Small Keep is a three-story, three-tiered turret forming the eastern cornerstone of the main keep complex. Together with the West Small Keep (Nishi Ko-Tenshu) and the Inui Small Keep, it forms the castle’s renritsu-shiki tenshu — an interconnected structure of one main keep and three small keeps joined by connecting corridor turrets. Constructed during Ikeda Terumasa’s 1601–1609 renovation and connected to the main keep via the I-Ro-no-Watariyagura corridor — which itself has one basement level (used for salt storage) plus two floors above ground — it functioned as a self-contained battle station allowing for fallback, resupply, and counterattack operations if the main keep were compromised. It is designated a National Treasure. Note: this site is not regularly open to the public and is occasionally accessible during special events — check the official Himeji Castle website for details.
| Year built | 1601–1609 |
|---|---|
| Builder | Ikeda Terumasa |
| Cultural property status | National Treasure |
Access: Approx. 10-minute walk (30 m) from Osakabe Shrine
Suggested time: Quick view ~5 min (exterior and walkway) / full experience ~15 min (when open to the public)
Inui Small Keep (Inui Kotenshu)
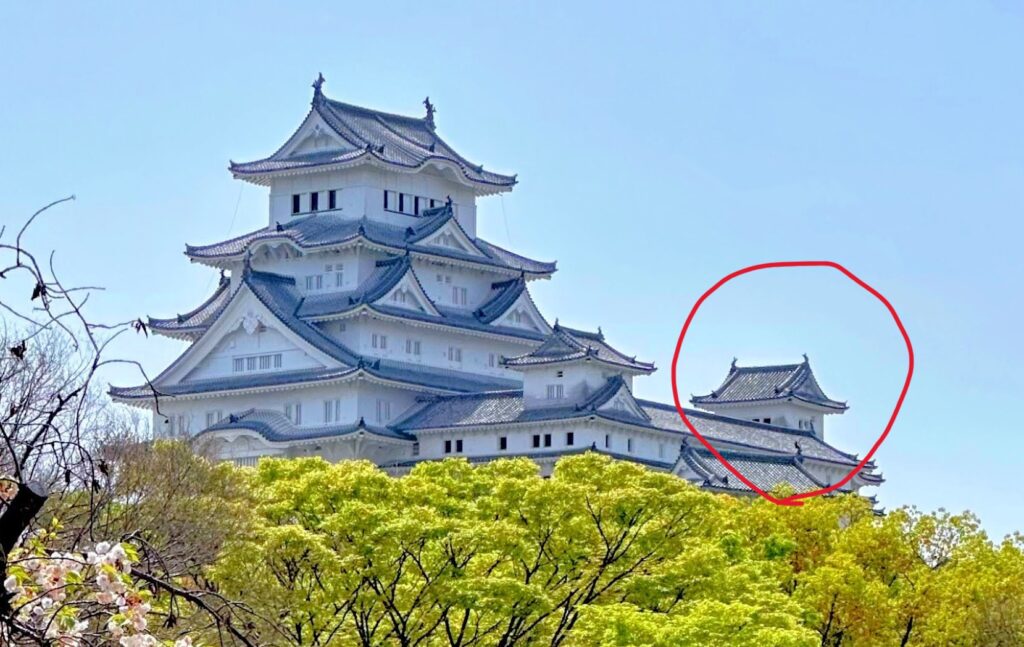
The Inui Small Keep is a three-story turret at the northwestern (“Inui” in traditional Japanese directional terms) corner of the main compound — a designated National Treasure and part of the castle’s renritsu-shiki tenshu, interconnected multi-turret complex, linked to the West Small Keep (Nishi Ko-Tenshu) via the Ha-no-Watariyagura corridor. Far from a mere auxiliary tower, it is a fully functional military facility equipped with sama, ishiotoshi, and steep staircases, standalone and combat-ready — even if the main keep fell, this turret could have served as a fallback point for counterattacks. Constructed during Ikeda Terumasa’s 1601–1609 reconstruction, it embodies the evolution beyond Hideyoshi’s simpler single-tower design. Note: this site is not regularly open to the public and is occasionally accessible during special events — check the official Himeji Castle website for details.
| Year built | 1601–1609 |
|---|---|
| Builder | Ikeda Terumasa |
| Cultural property status | National Treasure |
Access: Approx. 5-minute walk (50 m) from Higashi Ko-Tenshu (East Small Keep)
Suggested time: Quick view ~10 min (exterior and connecting corridor) / in-depth exploration ~20 min (when open to the public)
Ro Connecting Turret (Ro-no-Watariyagura)
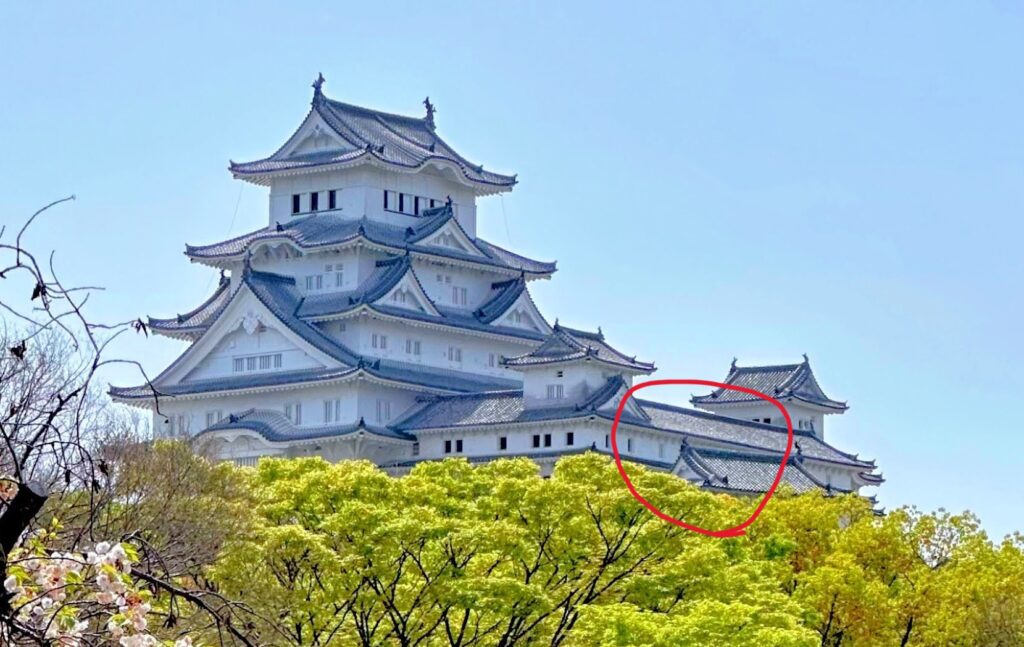
The Ro Connecting Turret (Ro-no-Watariyagura) is part of the I-Ro-no-Watariyagura connecting corridor on the East Small Keep side of the renritsu-shiki tenshu complex, linking the Main Keep (Daitenshu) with the East Small Keep (Higashi Ko-Tenshu) — not the West Small Keep, as sometimes stated in popular accounts. Together with I-no-Watari-Yagura, it has one basement level (used for salt storage) plus two floors above ground. Though it appears to be just a passageway, it is equipped with sama and ishiotoshi designed to repel attackers — if invaders breached the main keep, defenders could fall back through this corridor and continue resistance. Constructed during Ikeda Terumasa’s 1601–1609 reconstruction, it marks a dramatic evolution from the Toyotomi-era stand-alone tower designs. Note: this site is not regularly open to the public and is occasionally accessible during special events — check the official Himeji Castle website for details.
| Year built | Early 17th century (Edo period) |
|---|---|
| Builder | Ikeda Terumasa |
| Current status | Still standing |
Access: Approx. 10-minute walk (30 m) from Inui Small Keep
Suggested time: Quick view ~5 min (while passing through) / in-depth exploration ~15 min (when open to the public)
I-no-Watari-Yagura (Connecting Turret)
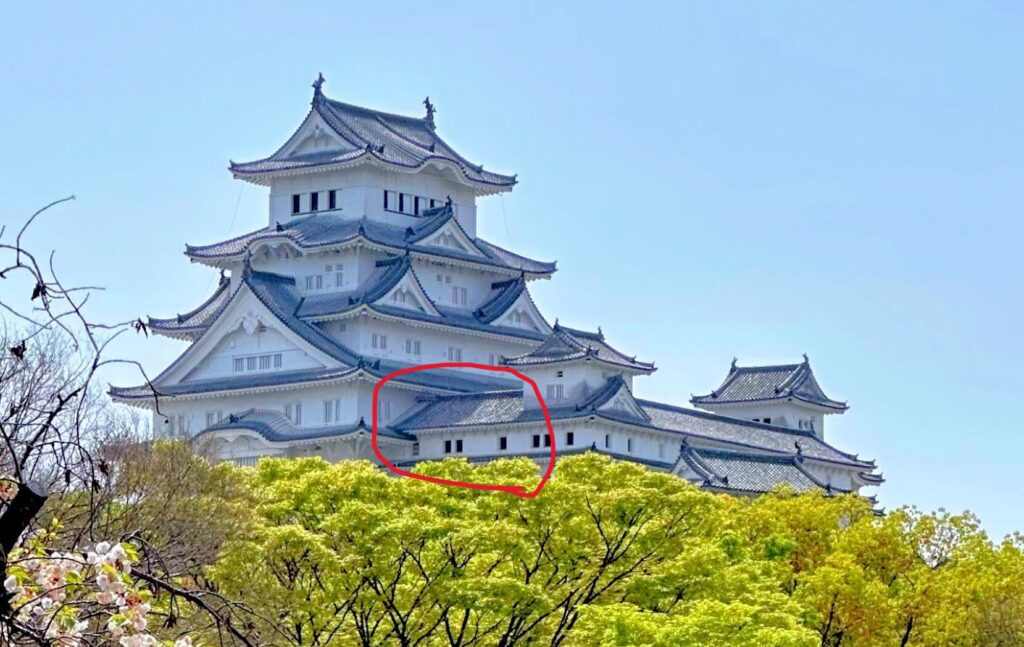
As its name suggests, a Watari-Yagura is a connecting turret — a covered passage linking key areas within the castle. On the East Small Keep side, this role is filled by I-Ro-no-Watariyagura (also referred to as I-no-Watari-Yagura in some sources), which connects the Main Keep (Dai-Tenshu) directly with the East Small Keep (Higashi Ko-Tenshu). It has one basement level, used for salt storage, plus two floors above ground. Far from a mere corridor, it was a combat-ready zone featuring arrow slits (sama) and stone-drop chutes (ishi-otoshi). This feature didn’t exist during Hideyoshi’s era — it was introduced during Ikeda Terumasa’s 1601–1609 expansion, when the castle evolved into its unique renritsu-shiki tenshu structure. Note: this site is not regularly open to the public and is occasionally accessible during special events — check the official Himeji Castle website for details.
| Year built | Early 17th century (Edo period) |
|---|---|
| Builder | Ikeda Terumasa |
| Renovation history | Preserved during major restorations in the 20th and 21st centuries |
| Cultural property status | Important Cultural Property |
Access: Approx. 10-minute walk (50 m) from Ro Connecting Turret
Suggested time: Quick stop 5 min / in-depth visit 20 min (when open to the public)
- I-no-Mon Gate
- Ro-no-Mon Gate
- Shōgun-zaka (Shogun’s Slope)
- Ha-no-Mon Gate
- Stone Lantern Base
- Ni-no-Mon Gate 🎥 360°
- The Cross-Emblazoned Onigawara
- Ro-no-Yagura
- Ho-no-Mon Gate 🎥 360°
- Shioyagura (Salt Turret)
- Aburakabe (Oil Wall)
- Ubagaiwa (The Old Woman’s Millstone Stone)
- Mizu-no-Ichi-Mon Gate
- Mizu-no-Ni-Mon Gate
- Ninosumi Turret
- Mizu-no-Sanmon Gate 🎥 360°
- Mizunorokumon (Water Gate No. 6)
- Himeji Castle Main Keep (Daitenshu) 🎥 360°
- Osakabe Shrine
- Higashi Ko-Tenshu (East Small Keep)
- Inui Small Keep (Inui Kotenshu)
- Ro Connecting Turret (Ro-no-Watariyagura)
- I-no-Watari-Yagura (Connecting Turret)
- FAQ
- Himeji Castle Map
- More on Himeji Castle
- Return to the Warlord Page
FAQ
Himeji Castle’s gates on the ascent to the main keep are named in sequence after the traditional Japanese syllabary (I, Ro, Ha, Ni, Ho…). This folded, maze-like arrangement of gates, called meiro-gata, reflects a defensive layout believed to have slowed and disoriented attacking forces, rather than a single confirmed, deliberate design intent.
The Main Keep (Daitenshu) stands 31.5 meters tall, or 46.4 meters including its stone base. It has 5 tiers on the exterior and 6 floors above ground plus 1 basement level (7 levels total), and is designated as both a National Treasure and UNESCO World Heritage Site. It has been repaired and restored repeatedly since its completion in 1609.
Walking through the full gate sequence and the Main Keep interior typically takes 90–120 minutes, including roughly 60–90 minutes for the keep itself if you go inside.
Himeji Castle Map
More on Himeji Castle
Return to the Warlord Page


☕ Support This Site
Following the Shogun is built on original fieldwork and on-site research.
If you found this guide useful, your support helps keep it going.

You can also support via QR code


comment